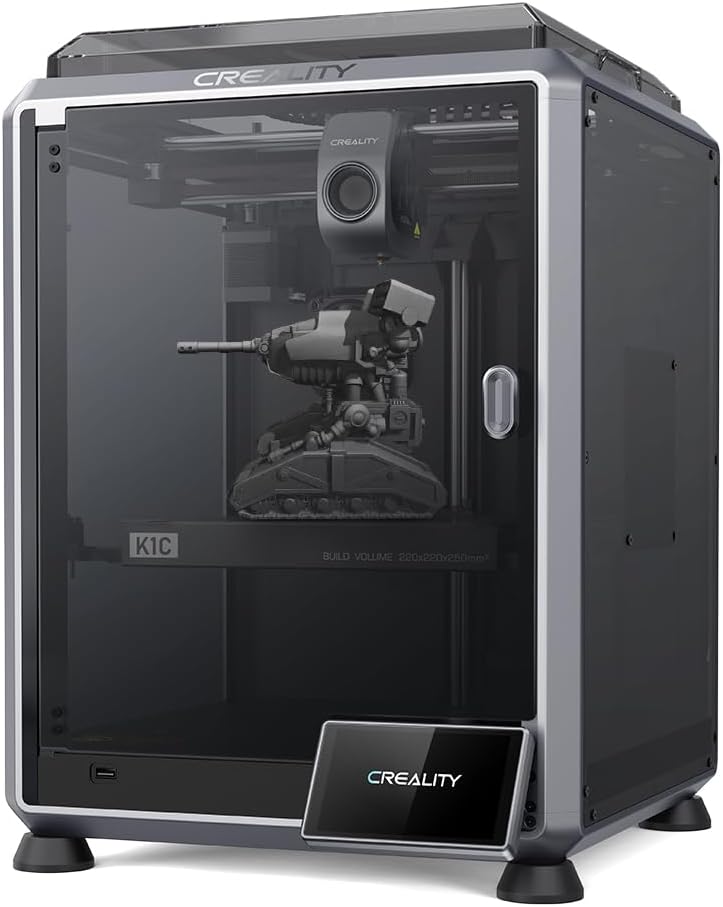
Comgrow 2024 Creality K1C Fast 3D Printer


Original price was: £499.00.£415.20Current price is: £415.20.
Comgrow 2024 Creality K1C Fast 3D Printer Price comparison
Comgrow 2024 Creality K1C Fast 3D Printer Price History
Comgrow 2024 Creality K1C Fast 3D Printer Description
Discover the Comgrow 2024 Creality K1C Fast 3D Printer
The Comgrow 2024 Creality K1C Fast 3D Printer is designed for both beginners and seasoned 3D printing enthusiasts. With its cutting-edge features and user-friendly capabilities, this printer is an ideal solution for anyone looking to bring their creative visions to life. In this product description, you’ll find everything you need to know about the Comgrow 2024 Creality K1C, including its key specifications, pricing details, customer reviews, and more.
Key Features and Benefits of the K1C Fast 3D Printer
The Comgrow 2024 Creality K1C is packed with features that enhance your printing experience. Here’s a breakdown:
- Compact Size: With dimensions of 12 x 12 x 10 inches, the K1C is designed to fit comfortably on any desk or workspace.
- Lightweight Design: Weighing only 27.3 pounds, it’s easy to move and set up wherever you need it.
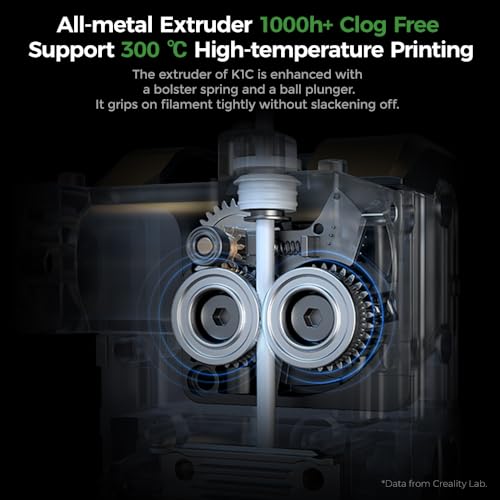
- Multiple Compatible Materials: Supports a wide range of materials including ABS, PLA, PETG, TPU, and more, allowing for versatile printing options.
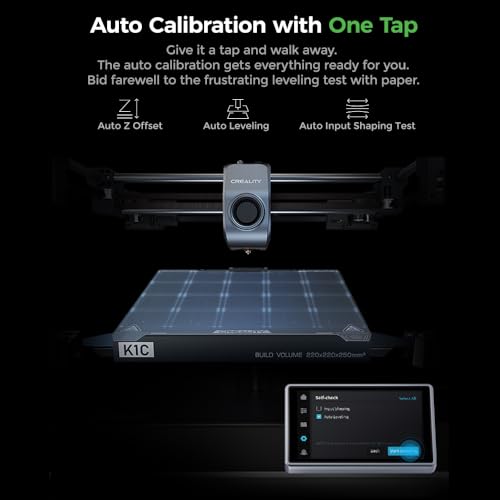
- Advanced Printing Technology: Utilize both Wi-Fi and USB connectivity, making it simple to send your files for printing.
- User-Friendly File Format Support: Accepts STL, OBJ, AMF, and GCODE file formats, ensuring compatibility with various design software.
- Cross-Platform Compatibility: Seamlessly operates on Windows and Mac OS, catering to a broad user base.
- Power Efficient: Runs on a voltage of only 115V, making it economical for regular usage.
Comparison of Prices Across Suppliers
When searching for the Comgrow 2024 Creality K1C Fast 3D Printer, you’ll find it competitively priced across various suppliers. Prices start at around $299, making it an affordable option for high-quality 3D printing. The 6-month price history chart indicates stability in pricing, with minimal fluctuations. This provides users confidence in their purchasing decision.
Notable Trends from the Price History Chart
Analyzing the 6-month price history for the K1C reveals an overall trend of steady pricing with occasional promotional dips. The printer was first available on December 19, 2023, and it has shown consistent value retention, making it a wise investment. Be on the lookout for potential seasonal offers, which could offer savings.
Summary of Customer Reviews
The reception to the Comgrow 2024 Creality K1C Fast 3D Printer has been overwhelmingly positive. Customers praise its easy setup process and the quality of prints produced. Key highlights from the reviews include:
- Excellent print quality with various materials.
- User-friendly interface, suitable even for beginners.
- Adequate support for different file formats.
However, some users have pointed out a few drawbacks:
- Initial calibration can be tricky for newcomers.
- Limited online support resources compared to other brands.
Overall, customers appreciate the value the Comgrow 2024 Creality K1C offers, creating a positive impression within the 3D printing community.
Explore Unboxing and Review Videos
To enhance your understanding of the Comgrow 2024 Creality K1C Fast 3D Printer, check out related unboxing or review videos on YouTube. These videos not only showcase the printer in action but also provide further insights into its ease of use and versatility. They often cover real-world applications and demonstrate how to set up and operate the printer effectively.
Ready to Elevate Your 3D Printing Game?
If you’re in the market for a reliable and efficient 3D printer, the Comgrow 2024 Creality K1C Fast 3D Printer is an excellent choice. With its superb features, competitive pricing, and positive customer feedback, it stands out in the crowded market of 3D printers.
Compare prices now! Discover the best deals and see why the K1C is the perfect addition to your crafting, prototyping, or production toolkit. Don’t miss out on enhancing your 3D printing journey today!
Comgrow 2024 Creality K1C Fast 3D Printer Specification
Specification: Comgrow 2024 Creality K1C Fast 3D Printer
|
Comgrow 2024 Creality K1C Fast 3D Printer Videos


Comgrow 2024 Creality K1C Fast 3D Printer Reviews (7)
7 reviews for Comgrow 2024 Creality K1C Fast 3D Printer
Only logged in customers who have purchased this product may leave a review.
photonashville –
Muy buen producto, recomendable para los que quieran empezar en el mundo de la impresión 3D, puede imprimir desde PLA, ABS, PETG e incluso TPU, solo es cuestión de agarrarle la maña, no gasta tanta energía, dependiendo del contrato de luz que se tenga tendrá que tener paciencia, pero en fin, buen producto
Michael Earls –
I am completely pleased with this printer and don’t see spending more money would add any value or improve prints, all around excellent.
Product arrived perfectly, excellent packaging, all parts included, no hardware issues.
This is my first 3D printer so I want anyone new to 3D printing to have a realistic perspective.
I have been printing jigs and parts useful in my woodshop and a few things for the printer itself. I had early success then lots of issues getting prints to stick then reached a plateau of excellent success with limited issues. Bad prints early on can just be stopped and restarted with the main screen.
What to expect:
• A steep learning curve, documentation is ok but doesn’t address everything, lots of mistakes and plenty of solutions you gain quickly from just doing it.
• Take the time to assemble the printer, square up the frame parts and review a couple assembly videos on youtube. They help to ensure early success in printing.
• Remove and clean the magnetic sheet with warm soapy water to remove any grease or dirt. Then carefully dab to dry and don’t touch the surface to avoid finger oils.
• If the magnetic sheet lays flat but is crooked, that is ok and affects nothing. I had to trim each side of the sheet by 1/8-1/4″ to avoid it touching the Z rails but it lays dead flat.
• Bed leveling and a clean bed are two of the most valuable checklist points to make in printing. Early on I was cleaning the bed with acetone and isopropyl alcohol but since I just now use soap and water to clean it, I have had so many successful prints and have not removed the magnetic sheet at all, just use the spatula. No finger oils, no need to clean, and all the plastic comes off.
• Use a feeler gauge 0.004″ (1.0mm) and level the bed all around so the tip just touches the gauge but doesn’t press hard because you can actually push the bed down and then it can spring back and be too close to the tip. Stay with 0.2 or 0.3mm layers in Cura slicing software early on (upgrade the software to current version). I think a feeler gauge is better than paper since paper can be compressed, fractions of a paper thickness can be the make or break it in successful prints. Home the head, set the bed just below it, disable the stepper motors from the Ender screen, then move the head around and begin to level the bed with the gauge. you can do the 4 corners only about an inch in or you can also check many other spots on the bed to ensure the bed is flat too with no cupping.
• Prints can take a very long time so correct setup and first layer adhesion are so critical to success.
• Cura defaults sometimes work and sometimes don’t, but custom settings make for a much higher success rate of prints adhering to the bed. *** The first layer is absolutely the most important layer. *** If it is not perfect or near perfect then prints will most likely fail in many ways, lifting up at corners, shrinking, popping off, skipping, spaghetti mess etc.
• Default print speed needs to be slowed down for the first layer. I am using as low as 15-20mm/s instead of the 30mm/s default. Go into preferences/settings/setting visibility and make some settings viewable in the custom window. 50mm/s is a decent normal print speed after initial layer. Top/bottom shell thicknesses can help add strength to many needed prints.
• Experiment with infill. 20-50% is common unless 100% fill is needed for a solid. Higher than 50% doesn’t really help much unless going full solid.
• Supports do help but are not necessary for every part with small hangovers unless you require a flawless print versus a shop needed print.
• Add a few extra lines for skirts to 5 which can aid in seeing any priming issues and early leveling issues. Brims are good for narrow and tall prints. Rafts can help with unique shaped prints for early layer adhesion and build.
• Cura will remember the settings from the previous print so you don’t have to start from scratch every time with settings.
• When a print is done, Cura puts in the gcode that the steppers are disabled so you can move the head or bed, but don’t move then around fast if they are not disabled.
Print an extension for the spool filament from thingiverse, it will help to keep the filament at a better arc and out of the Z lead screw.
Changing colors is simple, heat the tip up, then remove the filament and push in another color. The skirt/brim etc will prime the color so the part will be solid to the new color.
A solid table surface is good, nothing flimsy or wobbly.
Included spatula is excellent, sharp and removes prints very well.
Buy some full 1kg spools of colors you like and also try some test colors which come in small loose spools about 50g. I printed a small spool to hold the test colors which helps while printing so filament can spin smoother.
I am running the printer near non stop. I have many more dozens of things I want to print and just waiting to get through them all, at which point I’m sure to have added many more.
Have fun and create. Plenty of free files for printing, millions are out there. Yeggi.com is a great 3D print file search engine, along with myminifactory.com and thingiverse.com
photonashville –
Las primeras capas las imprime casi perfectas, pero de pronto extruye más filamento del necesario, no es posible realizar ajustes de ningún tipo mientras está imprimiendo, lo único qué se puede hacer es cancelar la impresión. Al imprimir directamente con el archivo en la impresora, no respeta las temperaturas. Un dolor de cabeza esta impresora 3d, CR-10 SE
Michael Earls –
This is my second 3D printer. The first one was a kit printer that took me about 5-6 hours to assemble. Once I had it built, it took me another 3 or 4 days until I had a decent print, and even then the quality was questionable. I spent the next two months buying parts and printing upgrades until I finally sold it to a friend who didn’t want to build his own.
When I got the Ender 3 Pro, I had it assembled in about an hour, following along with the Ender 3 assembly YouTube video by Tom Tullis. After one failed print (I didn’t have the bed leveled properly), I starting seeing perfect prints. This printer is awesome. It “just works”. After leveling the bed, the print quality is amazing. I have printed at .2mm and at .1mm quality and they both look fantastic. The layer lines are virtually invisible.
I am running Amazon Basics Gray PLA (I’m having such good luck with that filament that I just ordered a 3 pack of white Amazon basics PLA) and it has perfect layer adhesion. All of my prints are solid and sturdy. I didn’t know 3D prints were supposed to be sturdy because my first printer’s prints were all delicate and fragile. I just thought that was a fact of 3D printing. I was wrong. These prints are solid (well, 20% solid, anyway) and durable.
I highly recommend this printer to first time printer owners. Even though there’s some assembly required (more than the CR-10 family), the community around this printer is incredible and the Facebook group has a lot of helpful members. The video that I mentioned above is really all you need to get started, but you can count on the Facebook group to help you if something doesn’t quite work right.
I haven’t added any upgrades or printed any parts for my printer. It’s printing perfectly as a stock printer. It even printed a ~36mm bridge without a noticeable sag. I did buy a Creality glass bed from Amazon, but I haven’t installed it yet. I like the magnetic build surface and I’m not sure I want to lose it.
There have been a few things that make me uncomfortable, but I’ve learned to work with them and they’re not stopping me from printing or having a negative impact on my prints:
1) the X-Axis is uneven. I followed the instructions in the video to ensure that my X axis was level on both sides, but the screw holes on the printer that I got are just slightly off center. I have had to compensate by adjusting my bed higher on the left side and lower on the right side. That means that I have a tight screw and spring on the right side and a looser screw and spring on the left side. I think the only impact this has is that I need to level my bed more often than I might otherwise because the leveling screws on the left come loose. But, because the Ender 3 has large leveling knobs, it’s very easy to level this bed.
2) Cura prints a line of filament vertically across the length of the build plate on the far left side. I accidentally let it start when my bed was leveled incorrectly and the nozzle dug into my build surface. I now have a permanent gouge in my build surface that holds plastic. It isn’t affecting my prints, but it’s not attractive. Don’t expect to have a perfectly beautiful print bed for the lifetime of your printer. It’s going to get marks on it.
That’s pretty much it. For the price, I don’t think you can go wrong buying this printer. I certainly don’t regret paying Amazon’s price versus the overseas supplier (the shipping time for the other sellers was over one month). I paid the “get it now” tax and went with Amazon Prime shipping.
Christian Enrique Nava Alcantar –
Ça a fonctionné une dizaine de fois, mais ensuite l’axe z a commencé a sauté, vers le plateau et aussi vers le haut, c’est devenu impossible a réglé impossible à utiliser, et de pire en pire malgré le calibrage avec la feuille de papier ! ce qui a conduit à abimer le plateau lors d’un début d’impression alors qu’il a bien fait un « home » juste avant !
Problème de construction du matériel défaillant !
Et maintenant l’axe z remonte mais ne descend même plus
Je n’ai plus confiance en cette marque
Cliente de Amazon –
Viene sin montar pero las instrucciones vienen bien. Está muy bien la máquina pero para ajustarla es dificil
Francisco J. –
Es la primera que tengo y no puedo comparar con otras. Pero es fácil de montar y enseguida estas imprimiendo. Imprime pla perfectamente y tpu con apenas un par de mods que te imprimes tu mismo al igual que otras mejoras.